Встановлення й налаштування віртуального середовища Python
Кроки встановлення будуть розписані для Ubuntu, Debian та дистрибутивів на основі Ubuntu/Debian. У разі, якщо ви користуєтесь іншими ОС, можете знайти більше інформації тут або на офіційному сайті Python.
sudo apt-get install python3
sudo apt-get install python3-pip
sudo pip3 install virtualenv
mkdir -p serverless-python-examples/hello-world/app
cd serverless-python-examples/hello-world
Створіть віртуальне середовище та активуйте його:
virtualenv -p python3 venv
. venv/bin/activate
Наша робоча тека:
serverless-python-examples/hello-world/app
Створення AWS користувача для вашого застосунку
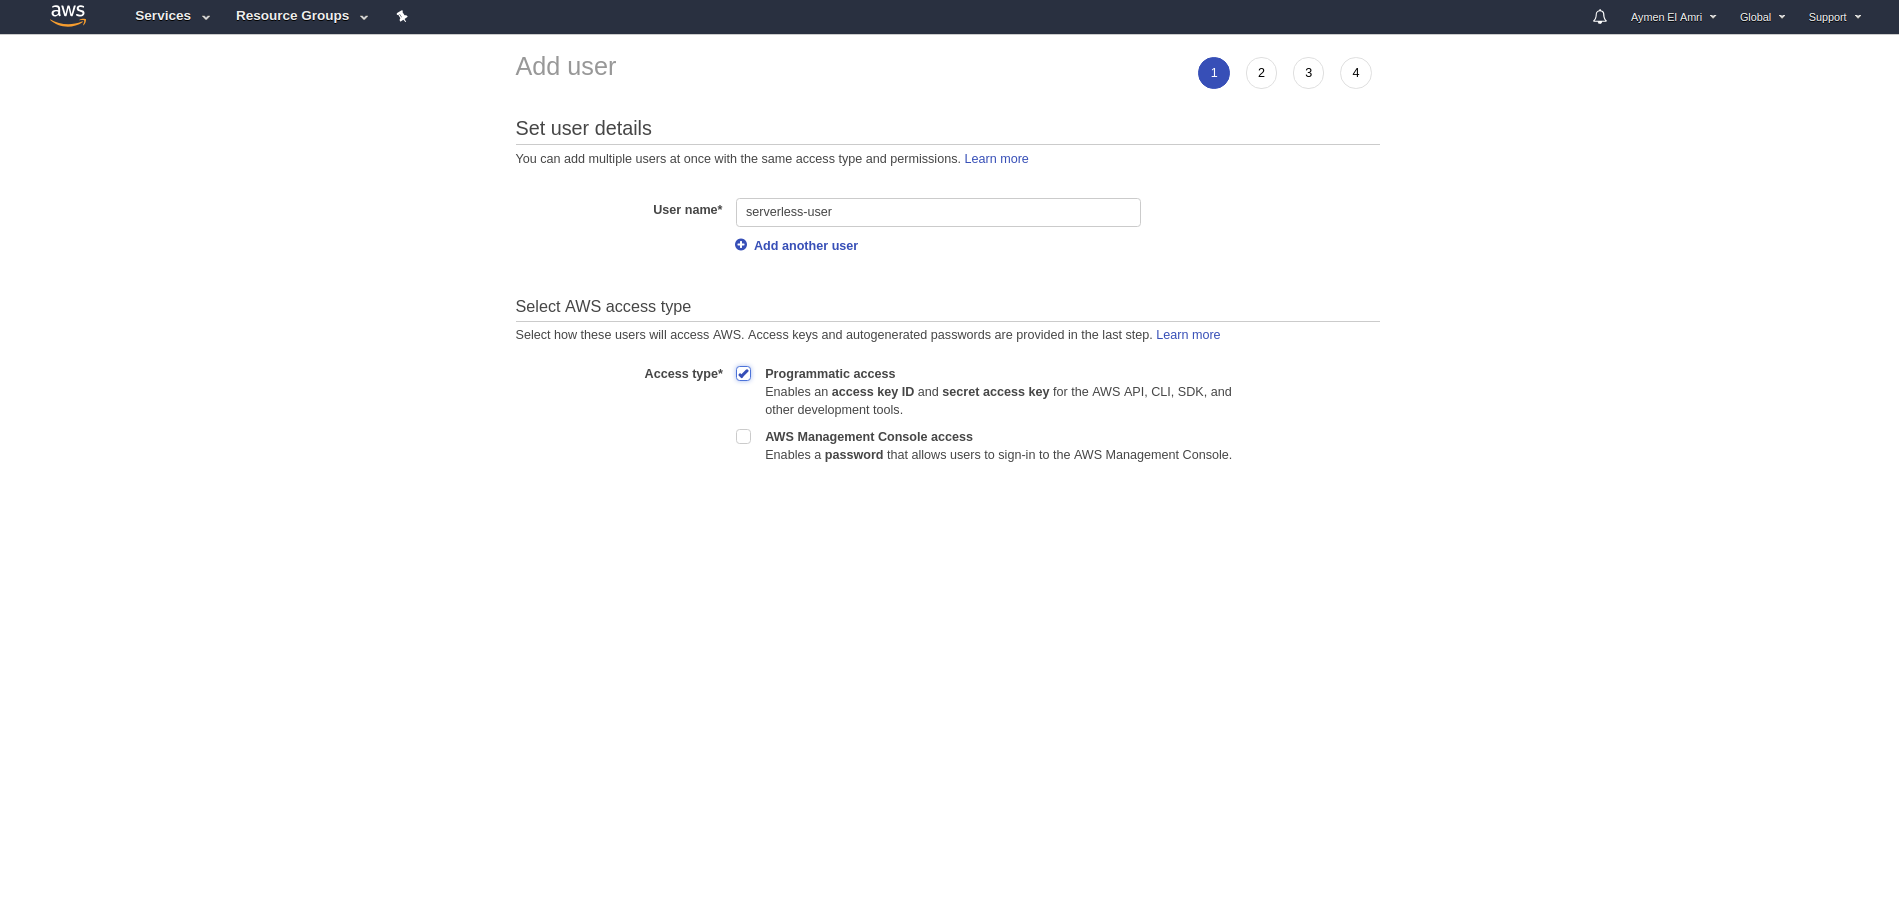
Другим кроком буде вхід у консоль AWS й створення нового користувача (ви також можете використати вже наявного користувача):

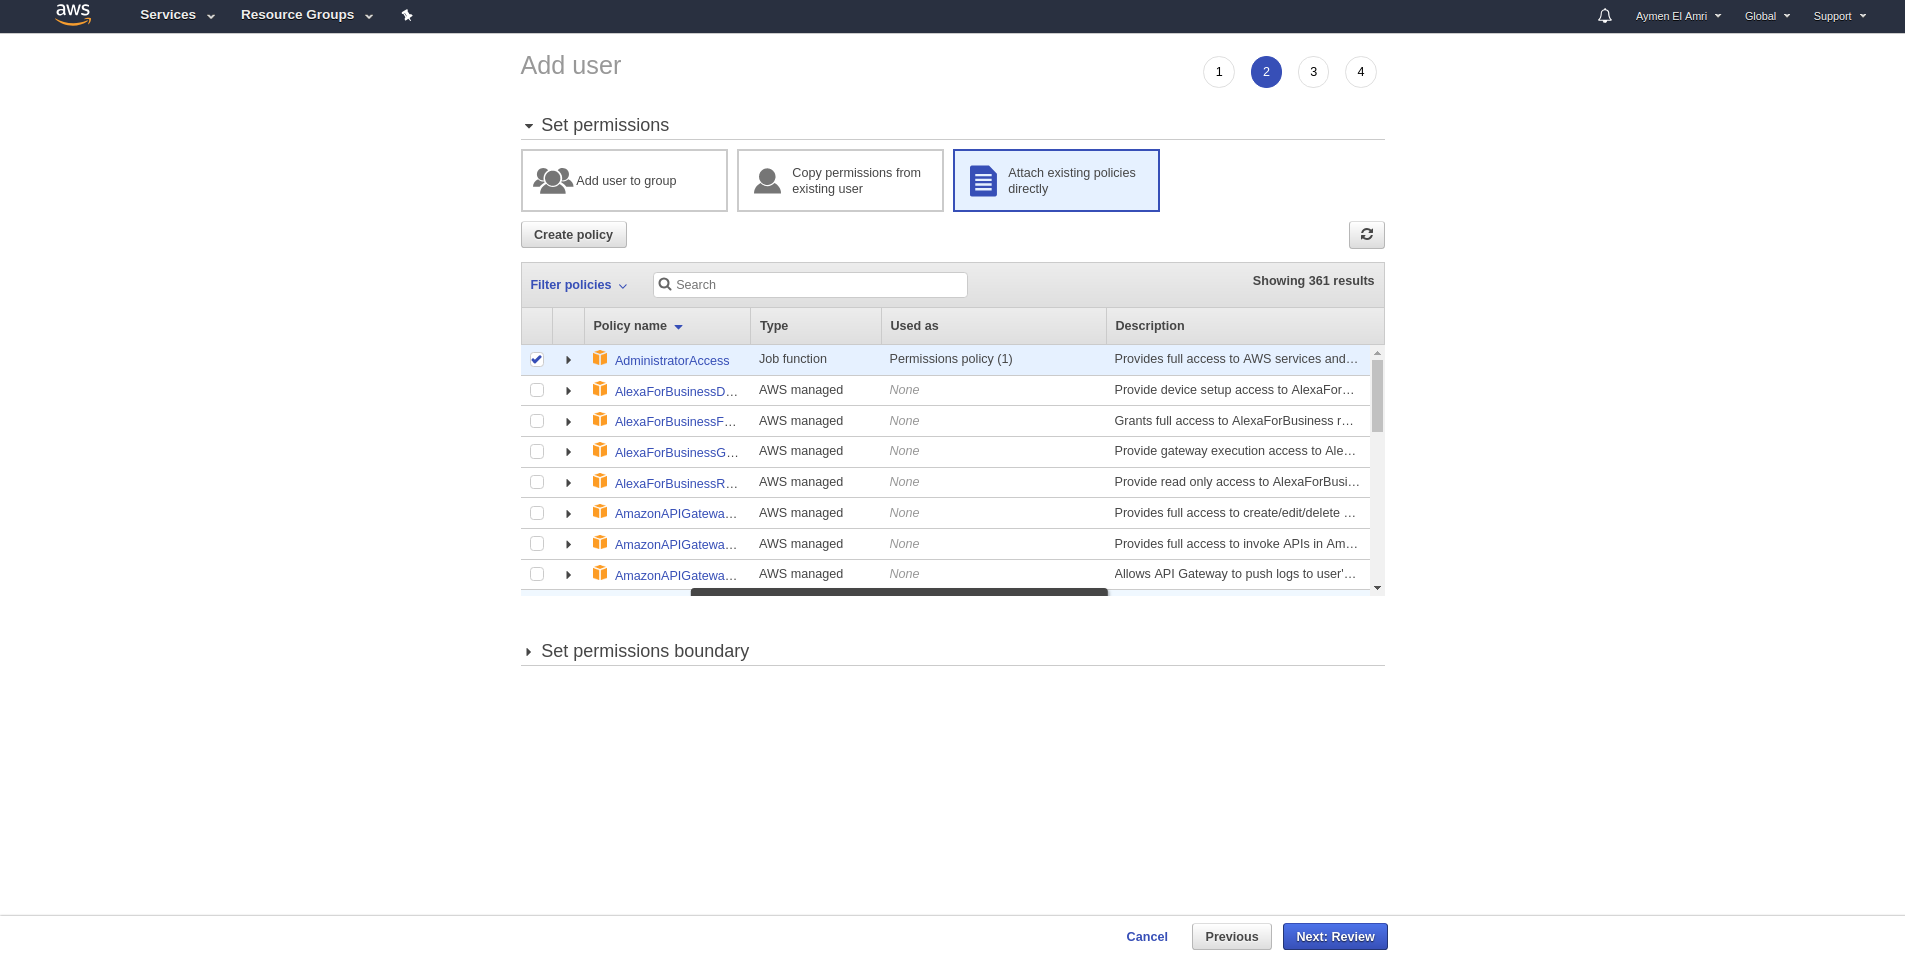
Додайте необхідні права для створеного користувача. Права Адміністратора (arn:aws:iam::aws:policy/AdministratorAccess) нададуть повний доступ до сервісів та ресурсів AWS.
Примітка: Коли річ стосується безпеки, права адміністратора не є кращим вибором. Ви можете налаштувати дозволи вашого користувача, обравши тільки ті AWS дозволи, які вам потрібні.

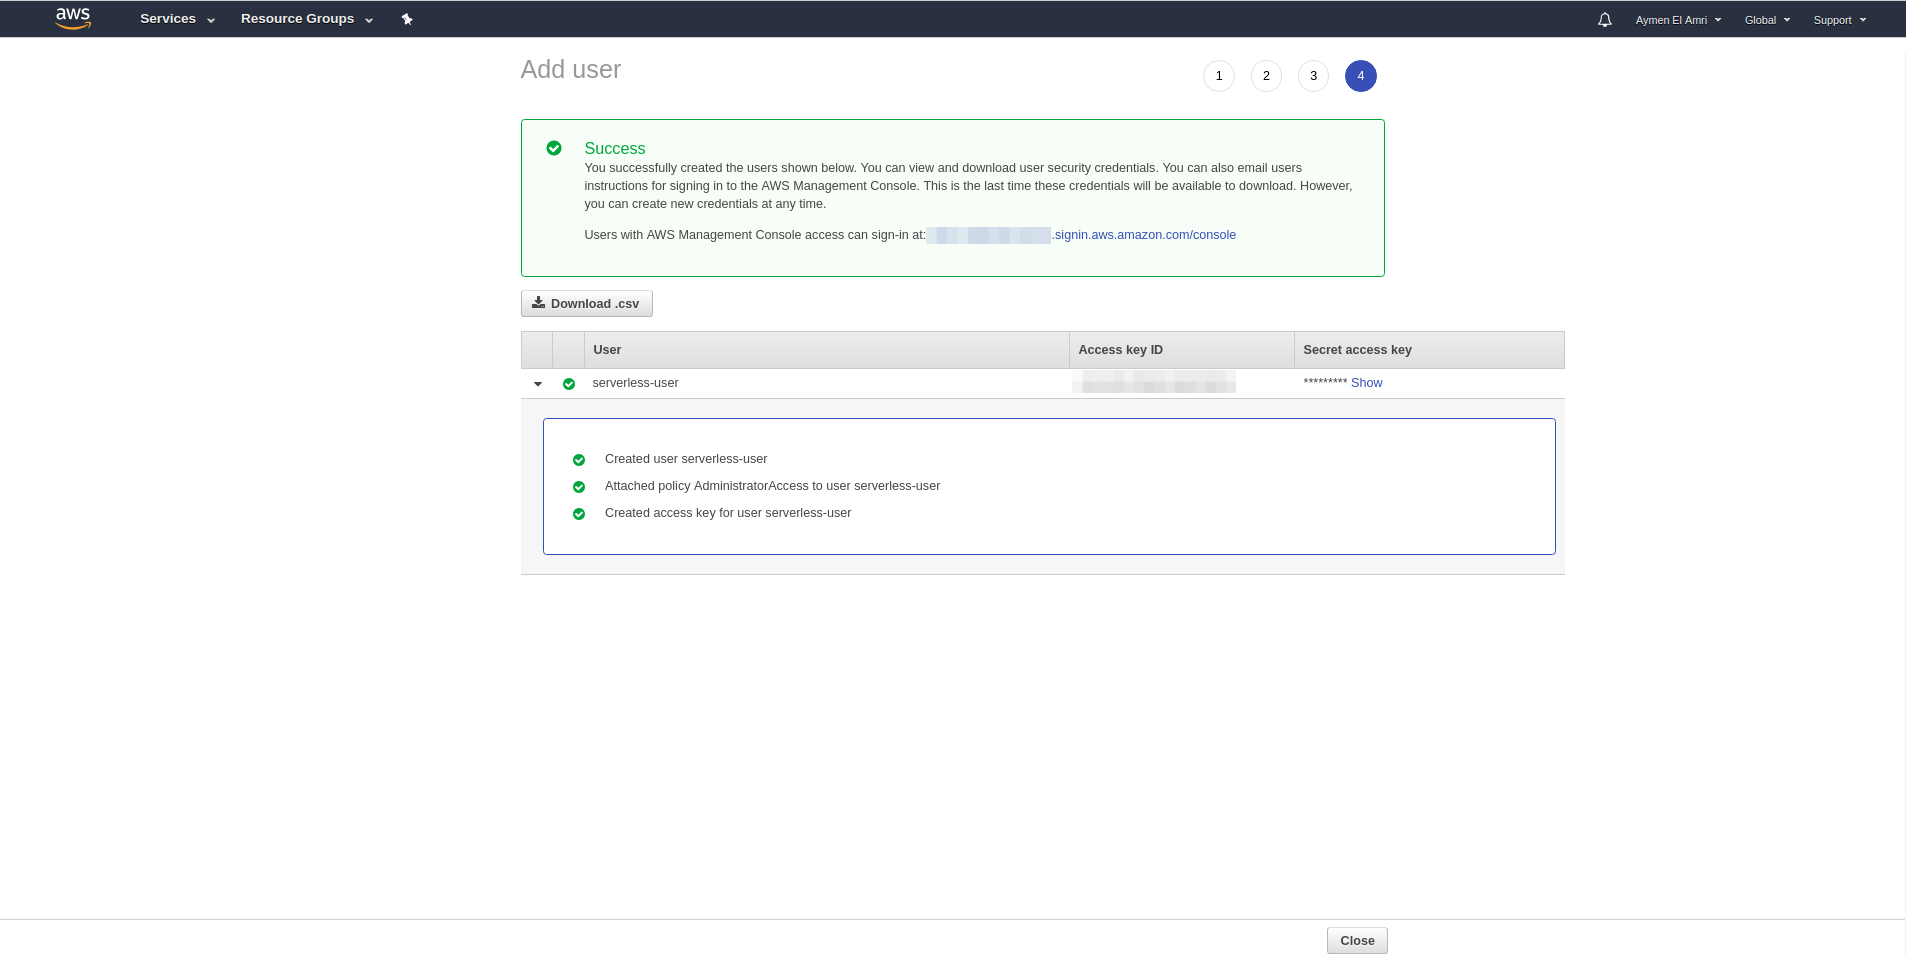
Майте на увазі, що ви повинні завантажити згенеровані облікові дані й зберегти їх у безпечному місці:

Для простоти я додав новий профіль до файлу:
~/.aws/credentials
з ім'ям
serverless

Додавши облікові дані до облікового файлу AWS, можна використати будь-яку команду AWS, використовуючи бажаний профіль.
Приклад:
aws s3 cp my_file s3://my_bucket --profile serverless
Встановлення й налаштування фреймворку Serverless
Ви можете встановити Serverless, використовуючи команду:
sudo npm install -g serverless
Тепер налаштуємо Serverless:
serverless config credentials --provider aws --key <ACCESS KEY ID> --secret <SECRET KEY>
Якщо ви зберегли key/secret в обліковий файл, то можете використати будь-які команди Serverless, вказавши у кожній з них профіль.
serverless deploy --aws-profile serverless
Можна також експортувати профіль і регіон у змінні середовища:
export AWS_PROFILE="serverless" && export AWS_REGION=eu-west-1
Ініціалізація проекту
У теці застосунку вам потрібно створити файл serverless.yml. Цей файл потрібен для налаштування поведінки застосунку.
Також треба створити функцію Python (що називається handler.py):
Щоб це зробити, пропишемо команду:
serverless create --template aws-python3 --name hello-world
Це створить файл обробника, файл конфігурації та файл .gitignore:
.
├── .gitignore
├── handler.py
└── serverless.yml
Ось так виглядає наш файл serverless.yml:
provider:
  name: aws
  runtime: python3.6
functions:
  hello:
    handler: handler.hello
А так виглядає файл handler.py:
import json
def hello(event, context):
    body = {
        "message": "Go Serverless v1.0! Your function executed successfully!",
        "input": event
    }
response = {
        "statusCode": 200,
        "body": json.dumps(body)
    }
return response
# Використовуйте цей код, якщо ви не користуєтесь подією http з LAMBDA-PROXY
    # Інтеграція
    """
    return {
        "message": "Go Serverless v1.0! Your function executed successfully!",
        "event": event
    }
    """
Розгортання нашого проекту
Як тільки будуть створені файли шаблонів, у нас буде робоча функція AWS Lambda. Нам потрібно її розгорнути:
export AWS_PROFILE="serverless"
serverless deploy
Примітка: вам потрібно змінити ім'я профілю на своє власне.
Вивід процесу розгортання виглядає таким чином. Ви можете бачити, що наш код архівується й розгортається у S3 bucket перед тим, як буде розгорнутим у Lambda.
Serverless: Packaging service...
Serverless: Excluding development dependencies...
Serverless: Creating Stack...
Serverless: Checking Stack create progress...
.....
Serverless: Stack create finished...
Serverless: Uploading CloudFormation file to S3...
Serverless: Uploading artifacts...
Serverless: Uploading service .zip file to S3 (390 B)...
Serverless: Validating template...
Serverless: Updating Stack...
Serverless: Checking Stack update progress...
................
Serverless: Stack update finished...
Service Information
service: hello-world
stage: dev
region: us-east-1
stack: hello-world-dev
api keys:
  None
endpoints:
  None
functions:
  hello: hello-world-dev-hello
Функція розгорнута.
Додавання подій до нашої функції
Хоча у вас вже є функція, що називається hello, і яка пов'язана з обробником функцій, на даний час у вас немає способу її запустити. Ось чому нам потрібно додати event у визначення функції в serverless.yml. Оновіть її наступним чином:
Ми визначили функцію hello, але не визначили спосіб її запуску, ось коли корисно додати event. Відредагуйте файл serverless.yml:
provider:
  name: aws
  runtime: python3.6
functions:
  hello:
    handler: handler.hello
    events:
      - http:
          path: hello
          method: get
Згідно з нашою конфігурацією, функція викликатиметься за допомогою ендпойнту /hello.
Примітка: ви можете обрати будь-який шлях замість цього.
Тепер розгорнемо:
serverless deploy -v
Serverless: Packaging service...
Serverless: Excluding development dependencies...
Serverless: Uploading CloudFormation file to S3...
Serverless: Uploading artifacts...
Serverless: Uploading service .zip file to S3 (390 B)...
Serverless: Validating template...
Serverless: Updating Stack...
Serverless: Checking Stack update progress...
CloudFormation - UPDATE_IN_PROGRESS - AWS::CloudFormation::Stack - hello-world-dev
CloudFormation - CREATE_IN_PROGRESS - AWS::ApiGateway::RestApi - ApiGatewayRestApi
CloudFormation - UPDATE_IN_PROGRESS - AWS::Lambda::Function - HelloLambdaFunction
CloudFormation - CREATE_IN_PROGRESS - AWS::ApiGateway::RestApi - ApiGatewayRestApi
CloudFormation - UPDATE_COMPLETE - AWS::Lambda::Function - HelloLambdaFunction
CloudFormation - CREATE_COMPLETE - AWS::ApiGateway::RestApi - ApiGatewayRestApi
CloudFormation - CREATE_IN_PROGRESS - AWS::ApiGateway::Resource - ApiGatewayResourceHello
CloudFormation - CREATE_IN_PROGRESS - AWS::Lambda::Permission - HelloLambdaPermissionApiGateway
CloudFormation - CREATE_IN_PROGRESS - AWS::ApiGateway::Resource - ApiGatewayResourceHello
CloudFormation - CREATE_IN_PROGRESS - AWS::Lambda::Permission - HelloLambdaPermissionApiGateway
CloudFormation - CREATE_COMPLETE - AWS::ApiGateway::Resource - ApiGatewayResourceHello
CloudFormation - CREATE_IN_PROGRESS - AWS::ApiGateway::Method - ApiGatewayMethodHelloGet
CloudFormation - CREATE_IN_PROGRESS - AWS::ApiGateway::Method - ApiGatewayMethodHelloGet
CloudFormation - CREATE_COMPLETE - AWS::ApiGateway::Method - ApiGatewayMethodHelloGet
CloudFormation - CREATE_IN_PROGRESS - AWS::ApiGateway::Deployment - ApiGatewayDeployment1534113893559
CloudFormation - CREATE_IN_PROGRESS - AWS::ApiGateway::Deployment - ApiGatewayDeployment1534113893559
CloudFormation - CREATE_COMPLETE - AWS::ApiGateway::Deployment - ApiGatewayDeployment1534113893559
CloudFormation - CREATE_COMPLETE - AWS::Lambda::Permission - HelloLambdaPermissionApiGateway
CloudFormation - UPDATE_COMPLETE_CLEANUP_IN_PROGRESS - AWS::CloudFormation::Stack - hello-world-dev
CloudFormation - UPDATE_COMPLETE - AWS::CloudFormation::Stack - hello-world-dev
Serverless: Stack update finished...
Service Information
service: hello-world
stage: dev
region: us-east-1
stack: hello-world-dev
api keys:
  None
endpoints:
  GET - https://x7o0xwsbkd.execute-api.us-east-1.amazonaws.com/dev/hello
functions:
  hello: hello-world-dev-hello
Stack Outputs
HelloLambdaFunctionQualifiedArn: arn:aws:lambda:us-east-1:998335703874:function:hello-world-dev-hello:1
ServiceEndpoint: https://x7o0xwsbkd.execute-api.us-east-1.amazonaws.com/dev
ServerlessDeploymentBucketName: hello-world-dev-serverlessdeploymentbucket-qqgrblrjprhu
Як ви можете побачити у логах розгортання, в AWS lambda тепер нова URL:
https://x7o0xwsbkd.execute-api.us-east-1.amazonaws.com/dev/hello
Ми можемо протестувати нашу функцію за допомогою браузера, інструментів на зразок Postman, CLI або команди виклику Serverless.
Використання CURL:
curl -X GET https://x7o0xwsbkd.execute-api.us-east-1.amazonaws.com/dev/hello
Вивід:
{
   "message":"Go Serverless v1.0! Your function executed successfully!",
   "input":{
      "resource":"/hello",
      "path":"/hello",
      "httpMethod":"GET",
      "headers":{
         "Accept":"*/*",
         "CloudFront-Forwarded-Proto":"https",
         "CloudFront-Is-Desktop-Viewer":"true",
         "CloudFront-Is-Mobile-Viewer":"false",
         "CloudFront-Is-SmartTV-Viewer":"false",
         "CloudFront-Is-Tablet-Viewer":"false",
         "CloudFront-Viewer-Country":"FR",
         "Host":"x7o0xwsbkd.execute-api.us-east-1.amazonaws.com",
         "User-Agent":"curl/7.47.0",
         "Via":"1.1 xxx.cloudfront.net (CloudFront)",
         "X-Amz-Cf-Id":"",
         "X-Amzn-Trace-Id":"Root=1-5b70bbe0-f318b862a8dfdb1e38fc337e",
         "X-Forwarded-For":"",
         "X-Forwarded-Port":"443",
         "X-Forwarded-Proto":"https"
      },
      "queryStringParameters":null,
      "pathParameters":null,
      "stageVariables":null,
      "requestContext":{
         "resourceId":"bsk6aq",
         "resourcePath":"/hello",
         "httpMethod":"GET",
         "extendedRequestId":"LiJLDHe3oAMF7kQ=",
         "requestTime":"12/Aug/2018:22:59:44 +0000",
         "path":"/dev/hello",
         "accountId":"xxx",
         "protocol":"HTTP/1.1",
         "stage":"dev",
         "requestTimeEpoch":1534114784336,
         "requestId":"6727b590-9e83-11e8-a9cc-61641c6c77ac",
         "identity":{
            "cognitoIdentityPoolId":null,
            "accountId":null,
            "cognitoIdentityId":null,
            "caller":null,
            "sourceIp":"",
            "accessKey":null,
            "cognitoAuthenticationType":null,
            "cognitoAuthenticationProvider":null,
            "userArn":null,
            "userAgent":"curl/7.47.0",
            "user":null
         },
         "apiId":"x7o0xwsbkd"
      },
      "body":null,
      "isBase64Encoded":false
   }
}
Використання виклику serverless:
sls invoke -f hello
Вивід:
{
    "statusCode": 200,
    "body": "{\\"message\\": \\"Go Serverless v1.0! Your function executed successfully!\\", \\"input\\": {}}"
}
Хвостова частина логів
Іноді вам потрібно побачити логи виконання або розгортання. Ось команда для виводу хвостової частини логів:
sls logs -f hello --tail
Видалення функції
Використовуючи команду sls remove, ми можемо видалити розгорнуту службу з AWS Lambda.
serverless remove
Можна додати інші варіанти, наприклад:
-
--stageабо-sНазва етапу в обслуговуванні. -
--regionабо-rНазва регіону в обслуговуванні. -
--verboseабо-vПоказує всі події стеку під час розгортання.
Примітка: видалення служби також видалить S3 bucket.
Ось і все. Ми побачили, як розгорнути нашу першу функцію Lambda за допомогою фреймворку Serverless.

Ще немає коментарів